Tuesday, August 7, 2012

Matlab plot to avi movie


t = 0:pi/200:2*pi;
y = sin(t);
% h = plot(t,y,'YDataSource','y');
h = plot(t,y);
i=0;
for k = 1:.1:10
    i = i+1;
y = sin(t.*k);
set(h,'XData',t,'YData',y) % Evaluate y in the function workspace
drawnow;
    M(i)=getframe;
    pause(.05)
end
%%
movie2avi(M,'MatlabAnimation','fps',4,'compression','None','Quality',10)

语录


"如果不能做自己喜欢的事,那就喜欢上自己正在做的事吧!"

也许只有当你们被自己的努力感动得泪流满面时,你们的生命才能叫作美丽的生命……
人是习惯的动物,形成一定的习惯以后就不再去思考和改变。这种不愿思考和改变的状态是一种惰性,一种僵化的精神状态,它使我们陷入了惯性思维,使我们失去了改变现状的勇气。我们每天在交通最拥堵的时候挤公共汽车;每天上网进行着无聊的对话;每天晚上回到家把电视从一个频道换到另一个频道,这些都浪费了我们大量的时间。但我们却很少去改变,去认真地思考如何让生活过得更高效、更充实。其实只要我们稍加努力,就可能不断改进我们的生活。

静静想一想自己的生活和工作,看看是不是有地方可以改变一下,进而把自己的学习、生活和工作安排得更好、更简单,让自己的每一天更有意义!

只要活着,就是胜利。就像一棵树一样,活着,总能够慢慢长大.

金字塔如果拆开了,只不过是一堆散乱的石头;日子如果过得没有目标,就只是几段散乱的岁月,但如果把一种努力凝聚到每一日,去实现一个梦想,散乱的日子就积成了生命的永恒。

Monday, August 6, 2012

Split widecreen monitor


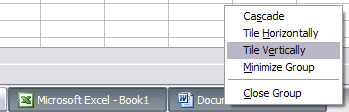
So in order to split your display down the middle either horizontally or vertically, first open two applications, let’s say Word and Excel. Now click on one of the tabs in the Windows Taskbar and then press and hold the CNTRL key on your keyboard. While holding down the CNTRL key, click on the other tab in the Taskbar. They should both be selected now (they should have a darker background than the other tabs).
split screen
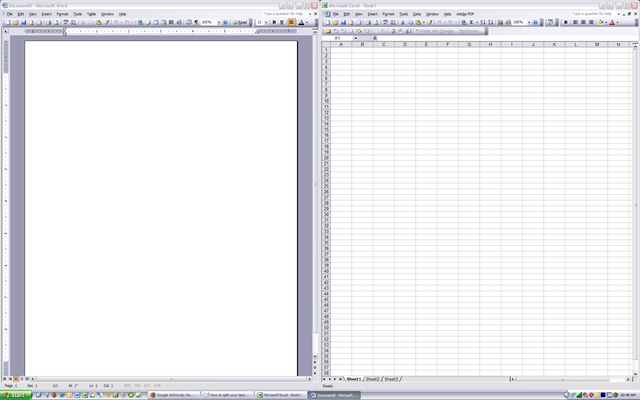
Now that both applications are selected in the Taskbar, right-click on either one and choose Tile Vertically from the options.
split monitor
And viola! You should now have Word on one side of the screen and Excel on the other side! If you want them in landscape view rather than portrait view, just choose Tile Horizontally.
split display
You can also split your screen three ways or more by simply selecting more applications in the Taskbar! Pretty easy! So that’s what is involved to split your screen if you have one monitor.

Thursday, June 14, 2012

WebCam in C++


#include <StdAfx.h>
#include <opencv.hpp>

using namespace cv;

int main(int, char**)
{
    VideoCapture cap(0); // open the default camera
    if(!cap.isOpened())  // check if we succeeded
        return -1;

    Mat edges;

    namedWindow("edges",1);
namedWindow("original",2);
    for(;;)
    {
        Mat frame;
        cap >> frame; // get a new frame from camera
        cvtColor(frame, edges, CV_BGR2GRAY);
        GaussianBlur(edges, edges, Size(7,7), 1.5, 1.5);
        Canny(edges, edges, 0, 30,3);
        imshow("edges", edges);
imshow("original", frame);
        if(waitKey(30) >= 0) break;
    }
    // the camera will be deinitialized automatically in VideoCapture destructor
    return 0;
}

Capture Webcam in C


// OpenCV1.cpp : Defines the entry point for the console application.
//

#include "stdafx.h"
#include <cv.h>
#include <cxcore.h>
#include <highgui.h>
#include <stdio.h>

int _tmain(int argc, _TCHAR* argv[])
{
   CvCapture* capture = cvCaptureFromCAM( CV_CAP_ANY );
   if ( !capture ) {
     fprintf( stderr, "ERROR: capture is NULL \n" );
     getchar();
     return -1;
   }
   // Create a window in which the captured images will be presented
   cvNamedWindow( "mywindow", CV_WINDOW_AUTOSIZE );
   // Show the image captured from the camera in the window and repeat
   while ( 1 ) {
     // Get one frame
     IplImage* frame = cvQueryFrame( capture );
     if ( !frame ) {
       fprintf( stderr, "ERROR: frame is null...\n" );
       getchar();
       break;
     }
     cvShowImage( "mywindow", frame );
     // Do not release the frame!
     //If ESC key pressed, Key=0x10001B under OpenCV 0.9.7(linux version),
     //remove higher bits using AND operator
     if ( (cvWaitKey(10) & 255) == 27 ) break;
   }
   // Release the capture device housekeeping
   cvReleaseCapture( &capture );
   cvDestroyWindow( "mywindow" );
   return 0;

}

Monday, June 11, 2012

Install OpenCV 2.4 with Visual Studio 2010

Download OpenCV 2.4
http://sourceforge.net/projects/opencvlibrary/files/opencv-win/

Extract the files into a folder ‘D:\Software\opencv’

Copy the following things to a folder in C:\OpenCV2.4
  D:\Software\opencv\build\x86\vc10
  D:\Software\opencv\build\include


Add the follwoing into system variable.
C:\OpenCV2.4\bin;C:\OpenCV2.4\bin\Debug;C:\OpenCV2.4\bin\Release


Create a new project and add this to your project properties:
1. Go to VC++ Directories;
2. Add 3 new Include Directories (it's the path where you installed OpenCV, include folder):
      C:\OpenCV2.4\include\
      C:\OpenCV2.4\include\opencv
      C:\OpenCV2.4\include\opencv2
3. Add 1 new Library Directory (it's the path where you installed OpenCV, lib folder):
      C:\OpenCV2.4\lib
4. Go to Linker in the left menu and select Input option
5. Add these entries on Additional Dependencies option(debug)

      C:\OpenCV2.4\lib\opencv_core240d.lib
      C:\OpenCV2.4\lib\opencv_highgui240d.lib
      C:\OpenCV2.4\lib\opencv_video240d.lib
      C:\OpenCV2.4\lib\opencv_ml240d.lib
      C:\OpenCV2.4\lib\opencv_legacy240d.lib
      C:\OpenCV2.4\lib\opencv_imgproc240d.lib

6. Add these entries on Additional Dependencies option(release)
      C:\OpenCV2.4\lib\opencv_core240.lib
      C:\OpenCV2.4\lib\opencv_highgui240.lib
      C:\OpenCV2.4\lib\opencv_video240.lib
      C:\OpenCV2.4\lib\opencv_ml240.lib
      C:\OpenCV2.4\lib\opencv_legacy240.lib
      C:\OpenCV2.4\lib\opencv_imgproc240.lib


Wednesday, June 6, 2012

Team Michigen Sensor

http://april.eecs.umich.edu/magic/about/

Primary sensor is a combined camera/LIDAR rig. The camera is a PointGray FireflyMV USB camera with a 2.8mm fixed focal length lens giving us about a 90 degree field of view. The camera is mounted on a pair of AX-12 servos which allow the camera to pan and tilt around its focal point, making panorama generation straight-forward. Integrated into the same sensor mount is a Hokuyo UTM-30LX LIDAR range finder. It is mounted on a third AX-12 servo, allowing us to produce 3D point clouds. Because the two sensors are well-calibrated with respect to each other, we can obtain color data for laser points, or ranges for camera pixels. Note that the camera/LIDAR mount was fabricated using our uPrint rapid prototyper.